Pen & Watercolour Art Tutorial - Step by Step Guide with Marco
- Jan 26
- 6 min read
Updated: Mar 10
Menu

Growing through phases and introduction.
Last summer Addison came to stay. He’s two, he’s our grandson and he is an absolutely adorable child. Sitting in the garden with him and watching him play with my wife’s watering can I took a series of photographs, one of which after some cleaning, became the basis of a pen line and watercolour painting on which the tutorial below is based.
When you are raising your own children, the world feels endlessly busy, and there are precious few moments to sit back and truly enjoy a child’s development. As a grandfather—and a retired one at that—that pleasure becomes one of life’s great luxuries.
Addison has already passed through a remarkable number of phases in his very full first 18 to 24 months. He seems to have decided very early on—probably at about three weeks old—that he wasn’t going to wait for career advice; he was going to do his own research.
It began with an infatuation with hoovers and cleaning. That particular career path didn’t last long—the pay, biscuits, and crisps simply weren’t up to standard for an inspiring your man. Along the way, however, he took product testing very seriously and insisted on having his own miniature “Henry” hoover. For days on end, he helped Mum at every opportunity, before moving on to bigger ambitions.
Next came buses, followed by several rides on one, which ultimately also failed to inspire. Diggers were the next passion, and now we are firmly in the era of bin lorries. Fully kitted out with the appropriate lorries, PPE, and high-vis gear, he goes out weekly to watch them at work. He has become something of a local celebrity with the bin men and even exchanges Christmas cards with them.
If I have to sit through one more episode of Thrash and Trash on YouTube, I may cancel the internet altogether. Yet, for all that, he is clearly a boy who knows where he’s heading, although teddies and baby dolls still play a very important role at bedtime.
This summer he was very keen to help "NeeNee" in the garden.
Granny was a stretch to say for an 18 month old and of course the Addison version stuck and my wife will now be NeeNee for ever in Addison’s vocabulary and now the rest of the family.
The Tutorial
Scanning the various reference images I had taken during Addison's stay I began to develop the bones of a Pen Line and Watercolour artwork. I am sure there are right and wrong ways to produce this form but as someone who is self taught I have found a series of preparatory steps that work for me.. I hope you find the following tutorial interesting and informative. Remember though that this is the process I use for creating a pen ink and watercolour artwork. It’s not the way I approach acrylics, charcoals or pastels.


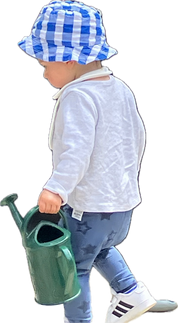


In fact I hadn’t intended to create a tutorial at all but skimming through my photos from last summer, looking for inspiration and at the same time willing this winter’s weather to improve, I came across the image above and my mind started to click into artistic mode. Having been a trainer for many of my business years I guess it comes naturally to want to share my experiences with others and help them learn.
Step 1 Developing the concept and knowing your limits
The concept and the creative ideas always start to form for me as I develop my first sketch. I am not looking for accuracy at this point just refining my ideas and building a conceptual image. It’s nice to have a reference photo but as with other works I have done the finished concept and ultimate composition build as I sketch. It’s almost like getting to know a friend it takes time to build a rapport. So, in building this Pen and Ink Tutorial, I will attempt to take you through the steps I use when creating a work such as this. In effect killing two birds with one stone. A resultant artwork for Addisons bedroom wall and I hope something worth reading for you.

You can see from the very rough sketch on the left that at this stage it is very rough. I make no excuses for it being rough, it took about 5 to 10 minutes to do. This is all about conceptual development.
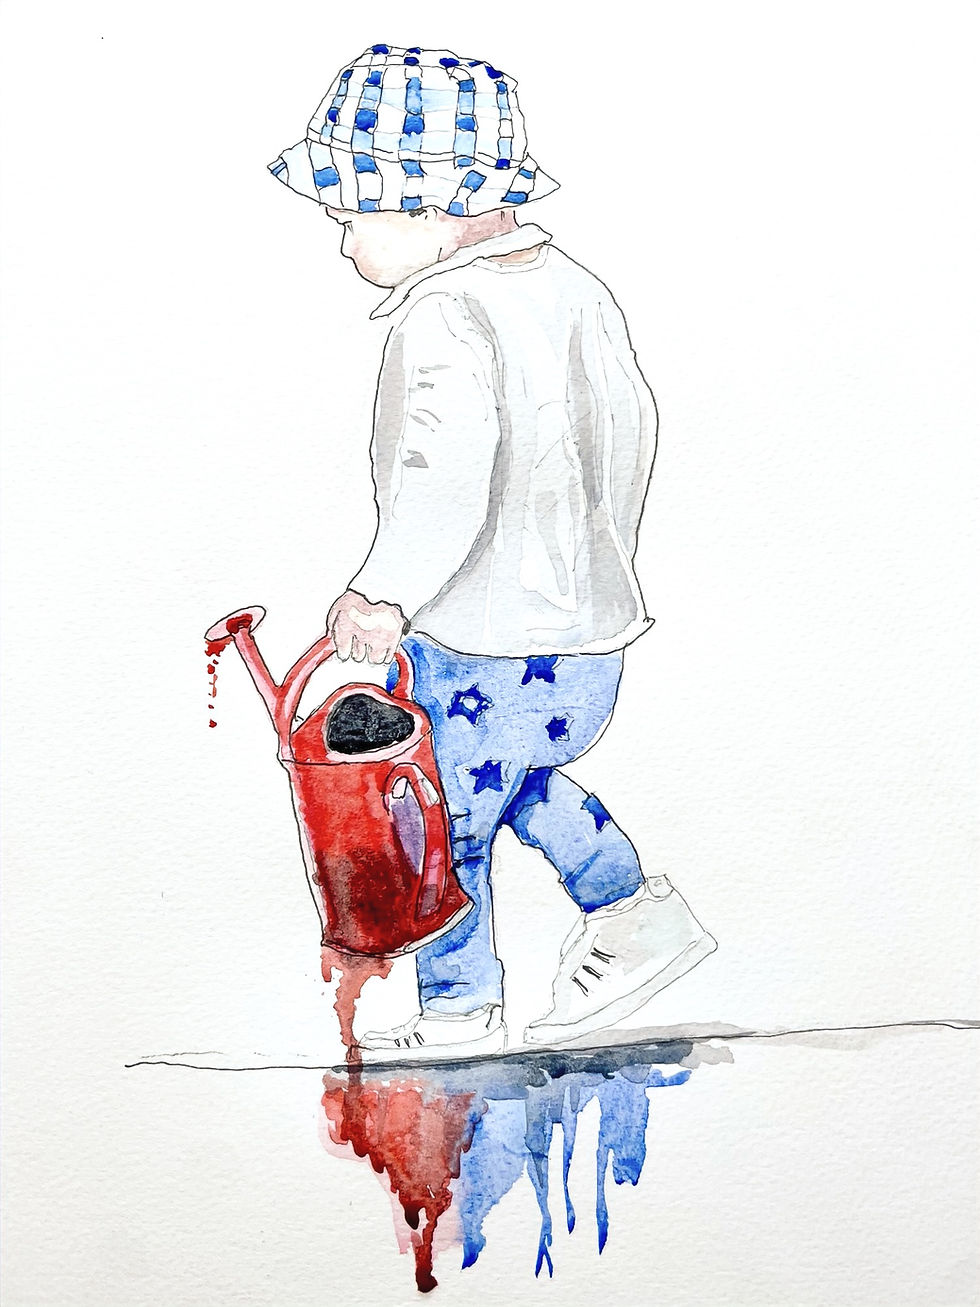
Ideas like the watering can bleed or the colour scheme are not fixed or even included, they came later.
Composition in a line and watercolour is crucial. Just as much as understanding what to leave in and what to leave out. At the same time other ideas start to take shape,rather like brainstorming any new project.
Everyone is different of course so I would be the last person to say you must do it this way.
This is just the way I start, your process may be different.
It is also worth stating that it helps to bear in mind your artistic ability. Remember art is as much for the artist as it is for the intended audience. You must enjoy it so, be honest with yourself and don’t set your goals too high. The sketch will tell you if your current skill level can achieve your goal. If not then lower your goals and simplify your concept. Skill comes with practice, making mistakes and knowing your limits. By setting realistic targets you will maintain your momentum and slowly get better. “Rome wasn’t built in a day”
Step 2 Developing the Lines

What do I mean by "Develping the Lines"?
Having set your goals in Step 2 we are now moving from an initial concept and composition to understanding which lines are important to making the final drawing work.
The image shown is an example from my sketch book where I am trying to refine and improve the facial character of Addison as well as simplifying the lines used.
Adrian Hill the great war artist and one of the first TV art teachers was a master at this. If you want to see how a true drawing master developed his skill while working as a war artist then treat yourself to one of his books. They are small, low cost and helped me greatly to develop my approach to sketch drawing. I wrote a blog about Adrian some months ago which I have included a link to below.
Step 3 Creating the Line Drawing


The goal is to produce a line drawing prior to adding colour so now I am going for accuracy of line and moving from sketch paper to watercolour paper. In creating a pen and watercolour work, the lines are just as important to the composition as the watercolour. This is not painting by numbers this is about creating the foundations on which to build. The resulting watercolour washes enhance the lines and move the sketch in to a piece of art, but the foundation lines are the skeleton on which you build.
The fewer the ink pen lines the better. I sometimes develop larger scale elements of the concept image to understand what lines create the likeness or help the concept. It also ensures that each time you draw the more the concept amd composition refines itself.

Step 4 Colour and Art
This is where you can let your imagination run riot. Change colours and tones, build on the concept and use your artistic license. It never ceases to amaze how colour changes a line drawing and developes the composition.
Step 5 Reflection and Detailing : Knowing when to Stop.
I have covered this before I left the above image to dry overnight and gave myself time for reflection.
Things to consider
Is the artwork complete as it is or are there small elements of detail that will enhance it?
Always let someone you trust review it and listen to their thoughts.
Consider where the piece will be hung and how? Borders and Framing can ruin or make an artwork. In terms of a border, I was torn between red or blue. As the finished work was in this case going to hang on Addisons's bedroom wall I had already decided on a white frame.
Finally. Don't rush to make changes. Live with the work for a day or so and see if you change your mind about any changes you might make.

So here is the final version with some very minor tweaks to the shoes, the watering can and drips. I hope that you have enjoyed this Pen and Watercolour Tutorial as promised there are some links below to three of the blogs I mentioned.
Want to read more of Marco's Guides?
Why not go to our free downloads
Want to buy a copy for your child’s bedroom ?
A limited number of giclée prints are available in The Eyecon Gallery


Comments